Tutorial, Part 2
To follow along in Part 2, you can use either the original scenarios.xml file,
or the iterator-based version, scenarios-iterator.xml. We will be running
scenarios common to both files.
2.0 Run “setup” on the baseline
We’ll start slowly so we can follow what’s going on. Let’s start by running only the setup step on the baseline scenario, using the command:
gt run -S base -s setup
The first time we run setup, it creates a local copy (using symbolic links when possible)
of the reference GCAM workspace that is subsequently used to create run-time sandbox directories
for each scenario.
This can be useful in a high-performance computing environment if you will be running numerous scenarios on compute nodes that have access to fast temporary storage, since each scenario will copy from that location rather than the reference GCAM which may be on a slower disk.
$ gt run -S base -s setup
INFO pygcam.project: [base, 1, setup] @setup -b base -g group -S base -w /Users/rjp/tmp/tut/sandboxes/tutorial/base -p 2050 -y 2015-2050
INFO pygcam.scenarioSetup: Setting up GCAM workspace '/Users/rjp/tmp/tut/sandboxes/tutorial/Workspace' for GCAM 4.3
INFO pygcam.scenarioSetup: Copying /Users/rjp/GCAM/gcam-v4.3/exe/Release/objects to /Users/rjp/tmp/tut/sandboxes/tutorial/Workspace/exe/Release/objects
INFO pygcam.scenarioSetup: Copying /Users/rjp/GCAM/gcam-v4.3/exe/XMLDBDriver.jar to /Users/rjp/tmp/tut/sandboxes/tutorial/Workspace/exe/XMLDBDriver.jar
INFO pygcam.scenarioSetup: Copying /Users/rjp/GCAM/gcam-v4.3/exe/log_conf.xml to /Users/rjp/tmp/tut/sandboxes/tutorial/Workspace/exe/log_conf.xml
INFO pygcam.scenarioSetup: Setting up sandbox '/Users/rjp/tmp/tut/sandboxes/tutorial/base'
INFO pygcam.scenarioSetup: Copying /Users/rjp/tmp/tut/sandboxes/tutorial/Workspace/exe/XMLDBDriver.jar to /Users/rjp/tmp/tut/sandboxes/tutorial/base/exe/XMLDBDriver.jar
INFO pygcam.scenarioSetup: Copying /Users/rjp/tmp/tut/sandboxes/tutorial/Workspace/exe/log_conf.xml to /Users/rjp/tmp/tut/sandboxes/tutorial/base/exe/log_conf.xml
INFO pygcam.xmlEditor: Generating local-xml for scenario base
INFO pygcam.xmlEditor: No XML files to copy in /Users/rjp/tmp/tut/projects/tutorial/xmlsrc/base/xml
INFO pygcam.xmlEditor: Copy /Users/rjp/GCAM/gcam-v4.3/exe/configuration_ref.xml
      to /Users/rjp/tmp/tut/sandboxes/tutorial/Workspace/local-xml/base/config.xml
INFO pygcam.xmlEditor: Writing '/Users/rjp/tmp/tut/sandboxes/tutorial/Workspace/local-xml/base/config.xml'
INFO pygcam.xmlEditor: Generating dyn-xml for scenario base
INFO pygcam.xmlEditor: Link 1 static XML files in /Users/rjp/tmp/tut/sandboxes/tutorial/base/local-xml/base to /Users/rjp/tmp/tut/sandboxes/tutorial/base/dyn-xml/base
INFO pygcam.xmlSetup: Link additional static XML files in /Users/rjp/tmp/tut/sandboxes/tutorial/base/local-xml/base to /Users/rjp/tmp/tut/sandboxes/tutorial/base/dyn-xml/base
Take a moment to examine the structure of your sandbox directory. If you don’t recall where
that is, you can run:
gt config sandboxdir
to find out.
2.5 Run the baseline
Now we’ll run all remaining steps for the baseline scenario.
We already ran the setup step, so if we wanted, we could use the
-k flag to skip it:
$ gt run -k setup -S base
But the setup step is fast in this case, so we might choose
to just run all the steps:
$ gt run -S base
We now wait while gt runs gcam, runs the defined queries to create CSV files.
Note that our project file instructs GCAM to stop at year 2050, which speeds things
up a bit.
When the commmand completes, look again at the sandbox directory in which all of this
took place and you should see the XML database files in the output directory,
and a few other directories created by gt.
2.6 Run a policy scenario
Let’s start by running just the tax-10 scenario:
$ gt run -S tax-10
Again, we wait while gt runs gcam and runs the defined queries to create CSV files.
Because this is a policy scenario, we will also compute the differences between
query results for “policy minus baseline”, and save these in the diffs directory
in the scenario’s sandbox. Our project file also generates a few plots to look at,
and it combines the generated CSV files into a single XLSX file for convenience.
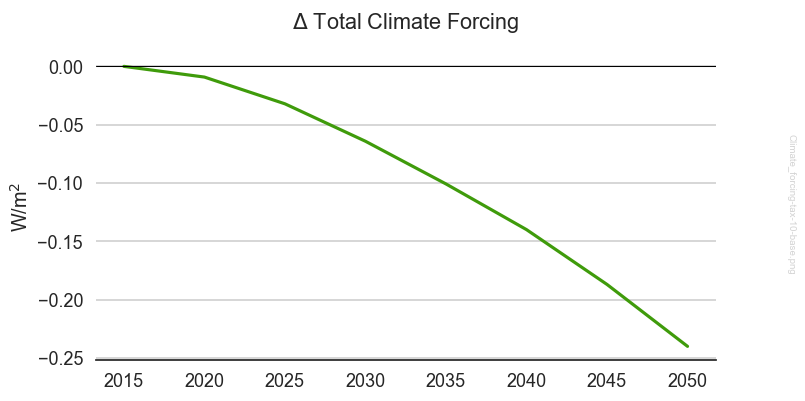
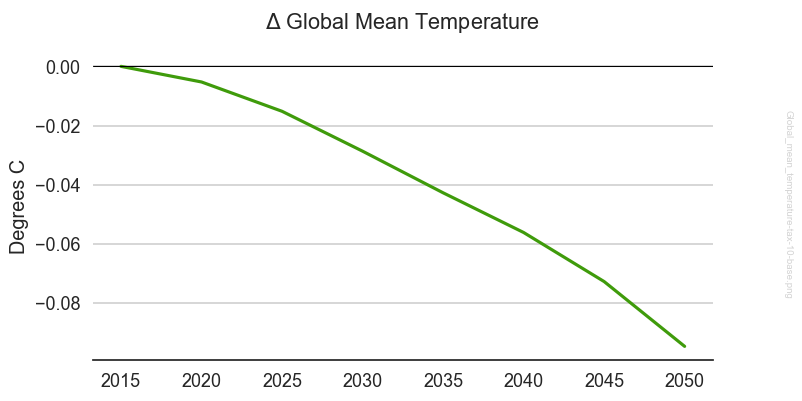
2.7 Examine results
In your sandbox directory for the “tutorial” project, you will see directories for
each scenario. Within each are folders queryResults and diffs, the prior
with results for this scenario only, and the latter for comparisons to the baseline
base. With diffs you should find figures with three plots that look something
like these:
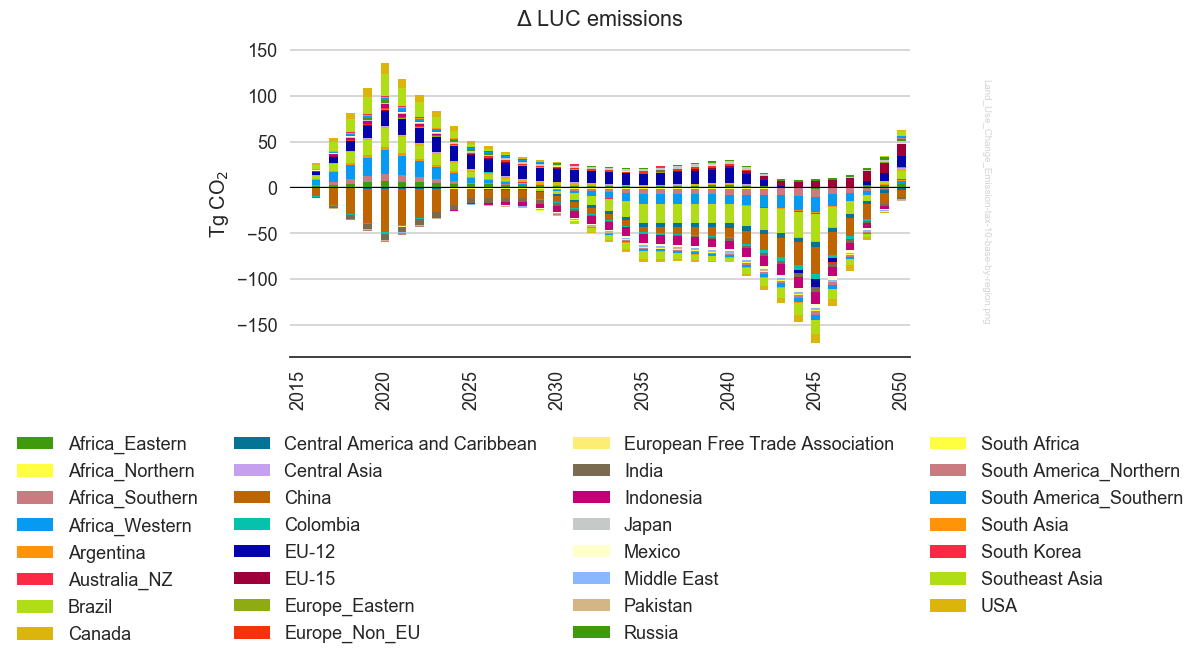
The final figure attempts to show results for all 32 regions, which makes for a very busy plot (and repeated colors, which aren’t helpful.) In Tutorial, Part 3, we will examine and customize plots, including aggregating regions.
2.8 Run all remaining scenarios
You can run all the scenarios with one command:
$ gt run
In our present case, we can save time by skipping the base and tax-10
scenarios, since we’ve already run them:
$ gt run -K base,tax-10
If you’re running this on a non-cluster system, this will take a while.
If you’re using a cluster, you can run (almost) everything at the same time
using the -D / --distribute command:
$ gt run -D
The --distribute option runs baselines before running policy scenarios that depend
on those baselines. (You can’t compute a difference until you have two scenarios.) The
baseline will be run first, with all policy scenarios queued as dependent on the
successful completion of the corresponding baseline.